By Pauline Weston Thomas for Fashion-Era.com

Bread dough is an easy-to-master craft for both children and adults. Adults enjoy making dough-crafted objects almost more than children, I believe this is because it reminds them of their childhood days. Kneading bread dough at Christmas could become an annual ritual, along with making a gingerbread house. In fact, you can make all sorts of bread dough models including jewellery earrings, necklaces and pendants. Favourites include the Xmas Holly plaque below and the holly wreath (easy) or tree ornaments.
Homemade Christmas Ornaments Dough Materials
The materials for sour bread dough craft are inexpensive. The basic ingredients are ordinary plain household flour, without raising agents, plus household table salt and tap water. However, getting the proportions correct does help and can vary according to the recipe. I still like the recipe below, which I first used 15 years ago.
No special equipment is required to get results, but with extra equipment, you can go to town with ideas. Cookie cutters speed up the process, sugarcraft cutters are even better.
To get started you need
- a large mixing bowl
- a rolling pin
- some baking trays
- silicone paper
- a knife
- a skewer or cocktail stick
- a small pair of scissors.
Whilst you can use special sugarcraft or cookie cutters, these are not essential to create dough objects. If you do use them, wash and dry them well after use, as salt residue can cause metal cutters to rust quickly. You will also need some cornflour (cornstarch) or flour to dust dough items that need to be rolled, rather than moulded.
A Good Ornaments Dough Recipe
Let's begin with a good salt dough recipe for average items. All the photographs of undecorated items shown on this page were made with this exact quantity of recipe. From this quantity, I got two hand-crafted wreaths and one Xmas tree plaque, plus various Xmas tree ornaments made using cookie cutters.
Baked Dough Items Made From One Batch of the Basic Recipe.

Instructions for making the 3 items above are further below.
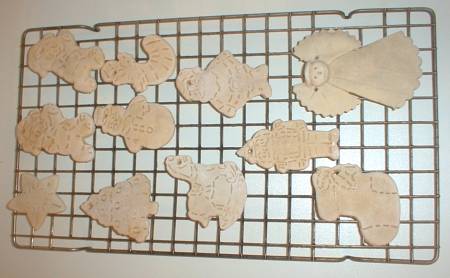
The tree ornaments also came out of the remaining dough. Apart from the hand-cut angel, these tree ornaments were made using Wilton Christmas Collection of 10 Cookie Cutters that cost me £4.
Although discontinued by Wilton at their online store, you can still buy this set of baking cutters at many other online cake and sugarcraft suppliers. They work brilliantly with my gingerbread house recipe too.
Because the sour dough loses modelling qualities quickly (within a few hours compared to clays), avoid doubling up the recipe unless there are more people involved making items. I almost always find this amount of dough recipe more than enough to handle and bake dry in one session. Storage can also soon become a problem, so work out where you might store these items.
Once the models have finished baking, they need to be painted and then a day or so later, varnished a couple of times.
If you intend to make lots of flat plaques like flat large decorative fish or houses, you should add wallpaper paste in the ratio of one part wallpaper paste to 8 parts flour and 8 parts salt, plus water to mix.
Pauline's Basic Christmas Dough Paste Recipe 1
Special Hints
The flour must NOT be strong bread flour, as too much gluten would cause it to overstretch and not keep its modelling lines.
Use a mug with approximately 250 ml of water, the exact amount depends on the gluten content of your flour. Do not make the water too hot, but a little warmth helps dissolve the salt. Too hot and the gluten will become overstretched and the dough will also get too sticky.
Begin by heating your oven to 130 degrees centigrade.
Prepare several flat baking trays with silicone paper. Make any paper patterns you need. Locate any cutters or tools you require before making the dough. Don't grease the trays and use silicone paper in preference to greaseproof paper for a smooth separation from the paper.
Pauline's Basic Bread Dough Paste Recipe 1
2 mugs of plain flour
1 mug of table salt
Approx 1 mug of lukewarm warm water (about 250ml)
Method
Measure level mugs of the ingredients as above. Mix the 2 mugs of flour and 1 mug of table salt together in a bowl. Make a 'well' in the centre of the mix and pour in about 1/2 of the mug of water. Now use a knife to mix it all together.
The mixture may be a little dry so add the final water just dessertspoon by dessertspoon, then teaspoon by teaspoon until you achieve a dough pliable enough to knead.
There may be some dry pieces in the bowl, but you may be able to knead that into the mix. You know that you have added enough water when the dough is firm, but not crumbly. It should not stick to your hands.
Now knead the dough on a smooth surface. Dust with cornflour if it's needed. Knead for 10 minutes. Don't cut out this kneading step. It really is important to knead well to remove air bubbles and also work out the coarseness of the salt. When the dough is ready, it will feel smooth, pliable and warm to the touch. If you don't knead the dough enough you will have uneven layers in your bread dough pieces.
The dough is now perfect for use.
I usually wrap my bread craft dough in greaseproof or silicone paper. It must be kept covered or it will dry and crack on the outside. Plastic cling wraps make it rather sticky with time. Some people leave it in a bowl covered with a damp tea towel. Just find which works best for you, as the humidity in your home may be very different from that in my kitchen.
My main recommendation is that once the dough is made, you work quickly with it to model pieces.
Modelling the Pieces
Take the silicone paper that fits your tin and put it on your work surface. I use pre-cut silicone circles in all my baking. I buy them from Lakeland. They are worth very penny as they are perfect circles, you get half a dozen sizes in a pack of 100 for about £4. The silicone paper also means the dough never sticks as it can on tins and on greaseproof paper.
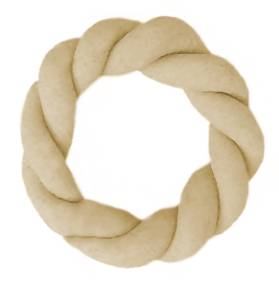
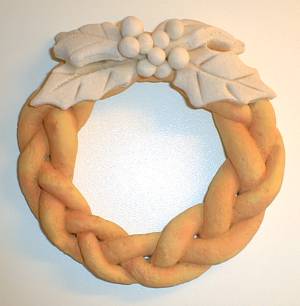
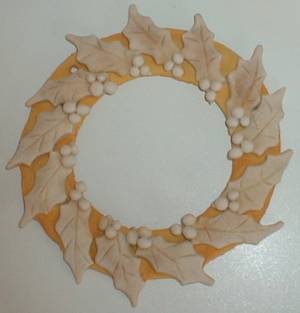
WREATH 1
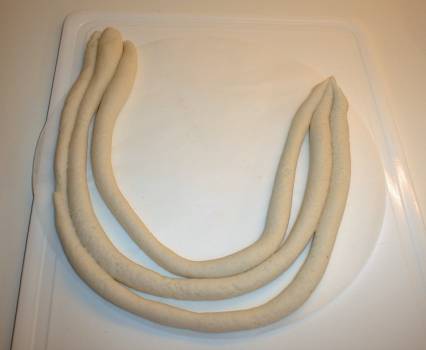
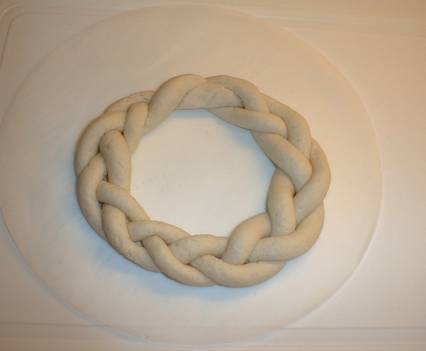
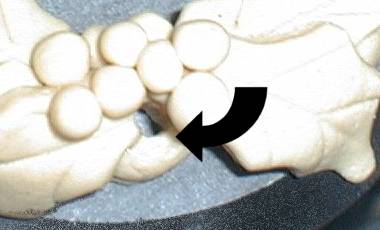
For the plaited wreath take a piece of dough and cut it into 3 even pieces. Roll them into long sausages fairly even in size. Shape it into a plait circle and join the raw ends of the plait by pinching them together as smoothly as possible.
Lift the paper-supported wreath carefully onto the baking tray.
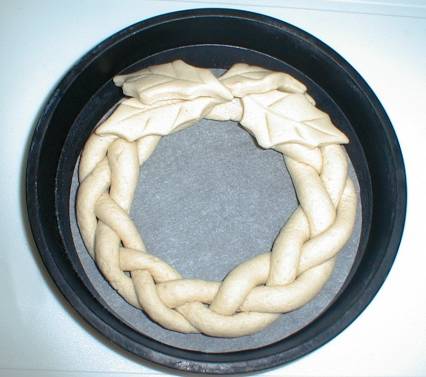
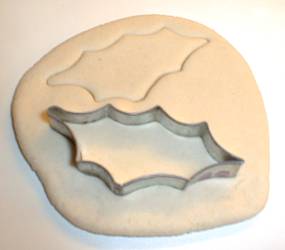
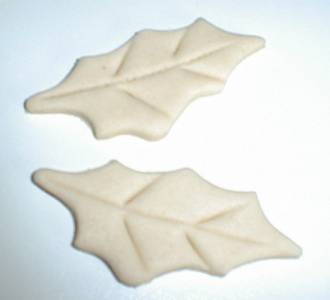
Cut some holly leaves using a holly leaf cutter. This is one cutter that is really worth buying as pastry holly leaves can be used to decorate Xmas foods like mince pies. You can also just mould holly leaves with your fingers or use the template and a scissors or knife to cut a holly leaf. Make the leaf markings with the back of a round bladed knife. Use water to position the leaves on the wreath ring.
Make a hole in the dough to loop your ribbon. Use a skewer to make a very definite hole that is large enough not to close up in baking. To do this, wiggle the skewer around until the hole is enlarged and about 5 to 7 mm.
Arrange little balls of dough for berries around the hole. Make them in range of sizes, from small to large. Stick them to the dough with just a little water. If you prefer, make a metal hanger, using a paper clip or bent hairgrip hooked deep into the wreath dough.
Bake the wreath at 130 degrees centigrade for about 2 hours until dry. If preferred used the half microwave method below.
If you find making a plait hard, just use two rolls of paste and fold one over each other as in this picture to create a twist. It looks just as good when done and is also more robust.
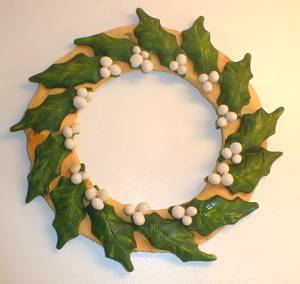
WREATH 2
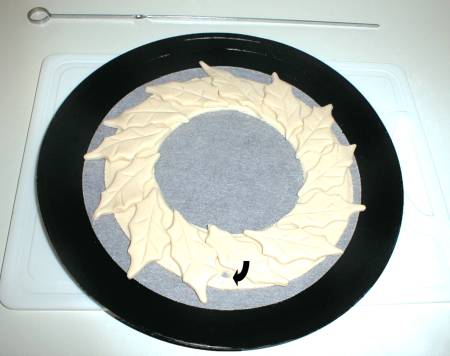
Take a lump of dough and roll out the dough for flat pieces directly onto the silicone paper. Move that onto your baking tin. Now work directly on the flat rolled piece of dough on the tin.
Use a plate as a guide to cut away excess paste from the outside. Now use a smaller plate or bowl to cut out the inner paste from the circle. I used an upside-down ice cream bowl with a stem base which was easier to handle than a saucer when cutting the inner circle.
Next, cut out about 14 holly leaves. Mark each leaf with leaf veins as above. Then have ready some water and a brush, carefully arrange the holly leaves evenly around the paste circle. Make 3 or 4 berries for each holly leaf and again stick them to the wreath with a little water.
Make sure you make one or two holes so you can hang the plaque.
If you prefer, make a dozen or so Christmas roses, or crackers or mini Xmas trees or snowmen instead of holly.
Bake the wreath at 120 degrees centigrade for about 2 hours until dry. If preferred used the half microwave method below.
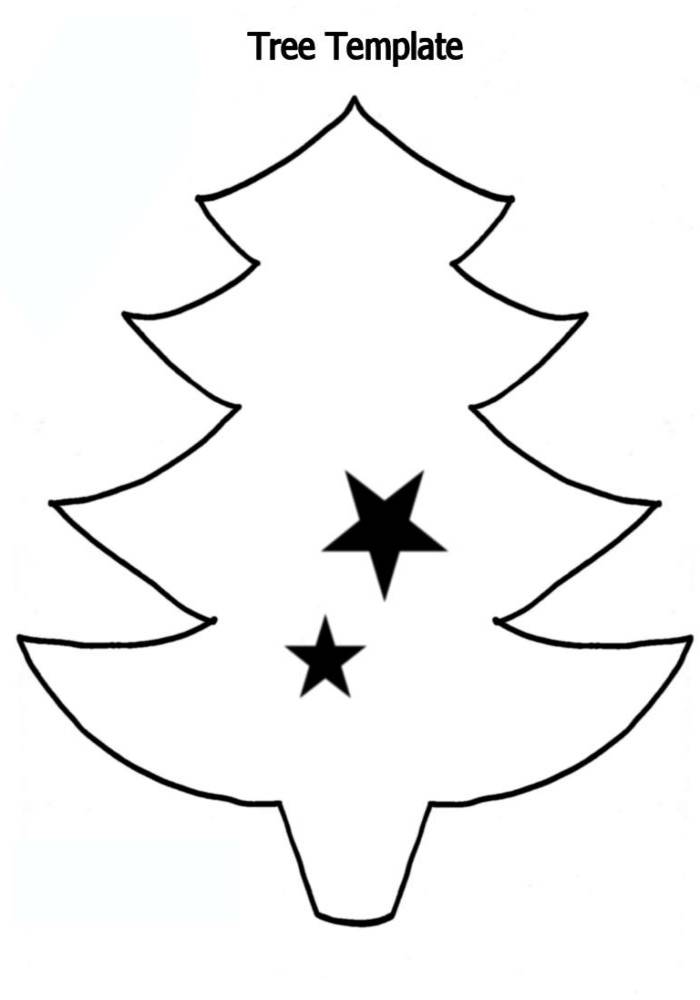
XMAS TREE PLAQUE
Use any size of the pattern provided or draw your own tree.

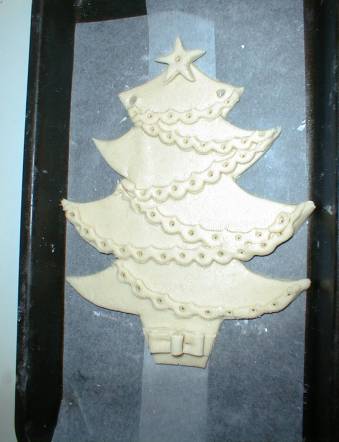
To make the garlands use a tin flan cutter or scalloped cutter and cut a circle from rolled out dough. Move the cutter about 5 or 6mm and cut a trimming off the round. Repeat this several times. Now pick up one piece and dampen the back slightly with water. As you take it off your work surface it will inevitably stretch, but use this fact to your advantage to make the garland fit a place on the tree.
To make the holes I used the point of a ball point pen. You could use a skewer or a cocktail stick. These holes help the garland stick well to the tree and can also be used as a support for seed beads, pearls or dragees when the item is decorated.
The bow on the tree flowerpot is simply a strip of thin bread dough shaped and made into an illusion of a bow. Cut a star, dampen the back and position it as a tree topper.
It is very important that you either make 2 holes toward the tree top to later insert a ribbon hanger. Or, use a paper clip at the tree top before baking dry.
Bake the Xmas tree until dry.
Pictures of the coloured and varnished bread dough items will follow soon.
Hints and Tips - Working with Craft Bread Dough Paste
When working with sour bread dough paste, remember these simple guidelines and you will have greater success.
It is impossible to be precise about the addition of the water, as the gluten content of all flour varies from milling to milling batch. For bread dough I always use the cheapest supermarket brand of household flour without raising agent at around 40 pence for a 1.5kg bag. Never use strong bread flour.
For larger items that need a rolling pin, do this rolling out directly onto a piece of silicone paper. As you carefully lift the paper onto your tin, support the item with a plate, or slide it from a work board into the tin. The larger the item the more care you need. Try a few ways until you find your best personal preference. You can also roll out directly on a rimless baking sheet or a rimmed baking sheet, but may need a smaller sugarcraft rolling pin to do this well.
Sour Bread dough should be baked as soon as it is modelled.
My own experience has left me with the firm belief that the dough should be prepared within a half hour of intending to model with it. If you can use it as soon as kneaded, so much the better. I do appreciate that in teaching situations sometimes you may have to prepare a batch of modelling dough. But try to do it as near to the modelling session as possible, a maximum of one hour before using.
Bread craft modelling dough goes off rapidly if it is kept for hours. The longer you leave it before modelling, the less the dough retains shapes and markings. Dough a day old will not produce anything like the definition of fresh modelling dough. You can almost see the indentations weakening and becoming limp as the shape collapses with time.
Baking should be in a slow oven or the dough can catch and darken. This darkening is not as important as some make out, especially if you intend to paint the item anyway. You can use an egg yolk and water wash on parts intended to be left natural. Whilst I like this look, I have found if you get the slightest drop of egg wash on other parts you cannot easily paint colours over the egg glaze. So now if I want any item to be golden I use my own mix of yellow gold paints to achieve that and have abandoned using egg wash altogether.
You can fully slow bake the items in an ordinary domestic oven at 120 degrees centigrade.
You can also use the microwave oven. You can do as I do and just half bake the bread dough in the ordinary oven to set the moulded impressions before the contours collapse. To speed up the drying out process, you can then microwave items for a minute or so at a time, until the bread dough item is dried out. You will need to rest the items on a cooling rack, as with ordinary cooked items between microwave bursts.
To make cooking in the microwave easy use a large fish slice utensil to lift the silicone paper with the item. Place it on the glass microwave dish where you have already placed 3 sheets of kitchen roll. The kitchen roll layers will help absorb the steam given off from the liquid that comes out of the bread dough craft item. Be careful when you handle the items. Because they are not fully hard they can when large bend too much so I caution care when handling.
Cool the items thoroughly.
Painting and Varnishing Bread Dough Craft Items
I think sour bread dough is best left at least a day in a centrally heated home or in a dry airing cupboard before painting to ensure they are quite hard. Then paint with watercolours, gouache paints, emulsion paints or acrylic paints. After that varnish the item with either wood varnish or yacht varnish. Water based varnishes are not as good, as you are trying to keep moisture out of the baked item. Spray varnish is also costly and not as effective as two or three coats of wood varnish. To my mind, bread dough craft looks far better with a glossy or silk varnish finish than matt varnish finished.
Painting and Varnishing ornaments Dough Craft Items
These Xmas Salt Dough craft items can be used to decorate any part of the house, although I like to hang them around my kitchen.
As explained on the previous page the baked items need to be painted and varnished. Therefore, I think that it is best to leave Salt Dough for at least a day in a centrally heated home or in a dry airing cupboard before painting to ensure items are quite hard.
Then paint with watercolours, gouache paints, emulsion paints, poster paints or acrylic paints. (For fruit wreaths, I suggest using watercolours to get beautiful variations and a build up of tones on apples, pears and plums etc. You can see some colour guidance for these items in the Marzipan Fruits section.)
After drying the Salt Dough items, varnish the models with either wood varnish or yacht varnish. Water based varnishes are not as good, as you are trying to keep moisture out of the baked item. Spray varnish is also costly and not as effective as two or three coats of wood varnish. However, spray varnish is rapid and will go into awkward places. To my mind, Salt Dough craft looks far better with a glossy or silk varnish finish than a matt finish.
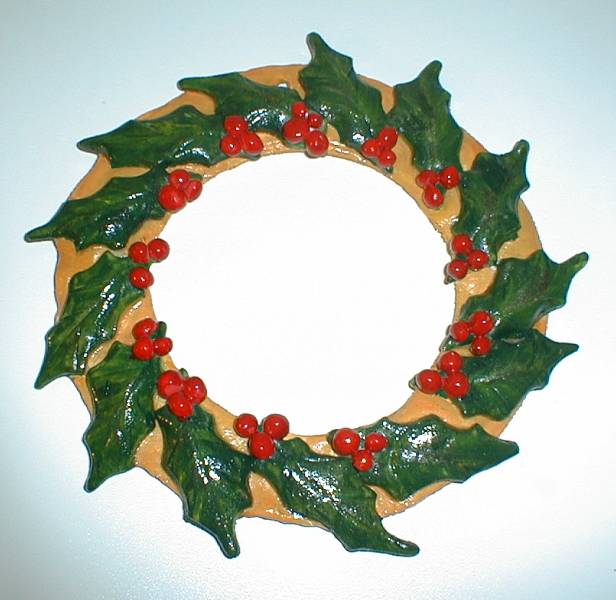
These three items were all painted in rotation together. Wait until each piece is touch dry before adding the next colour. By painting several pieces together, by the time one item is painted another item will be touch dry. You will probably be horrified when I tell you it took me almost 3 hours to paint these items below. They would need very careful intricate painting.
Painting Ornaments Dough - Backgrounds
With a medium brush, paint the background layer of each wreath first. I mixed a primary yellow with a touch of primary red to get the egg yolk colour. Once the first layer of the yellow base was down, I added a touch more red to the yellow and worked some slightly deeper paint shadows into the places where the shadows would fall. This gives the appearance of the plait more depth of interest.
Allow the items to touch dry to avoid smudges of paint.
Painting the Holly
Next, I used a small fine narrow sable brush to paint the holly leaves. Paint the leaves a rich green. But whilst the paint is still wet, mix some yellow with green to add variegated areas along the veins. This helps add detail that is more interesting. The enlargements will show more colour detail. You could also use a synthetic Daler brush.
Finally, I painted the holly berries a rich bright primary red. Then I mixed a little black into the red to create a subtler shade of red to dab onto parts of berries to get a more subtle colour variation.
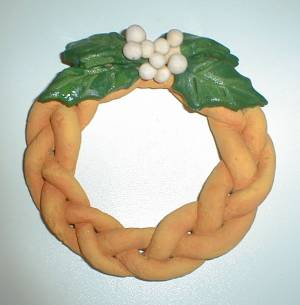
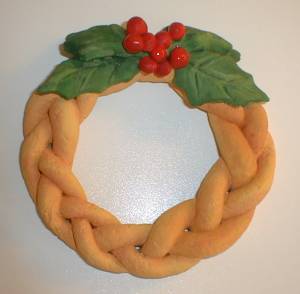
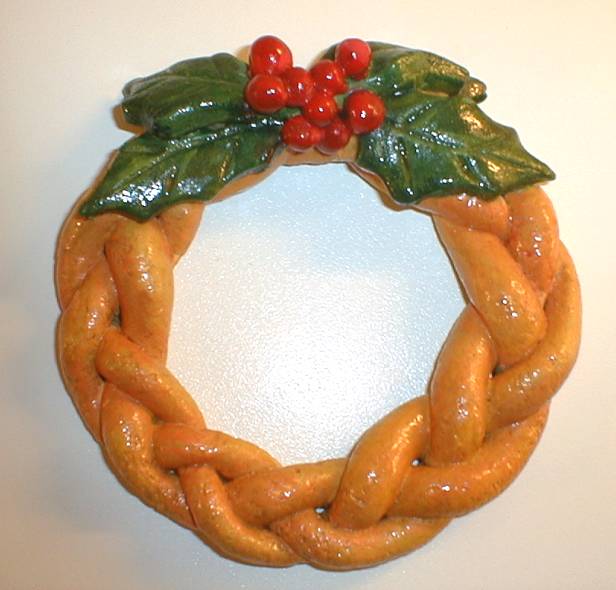
When you finish painting the dough, touch up your errors with the correct colour paint. Allow the fully painted items to dry overnight or for 8 hours in a warm dry place. Be sure they are fully dry. You could put them in your oven for a short time if you like. Just make sure all moisture is dried out as the dough can develop mould if it is damp and the damp can be unwittingly sealed in by the varnish. After that, varnish the items using yacht or wood varnish.
XMAS TREE PLAQUE
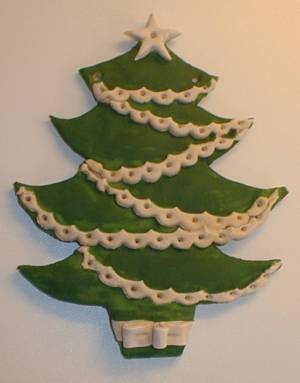

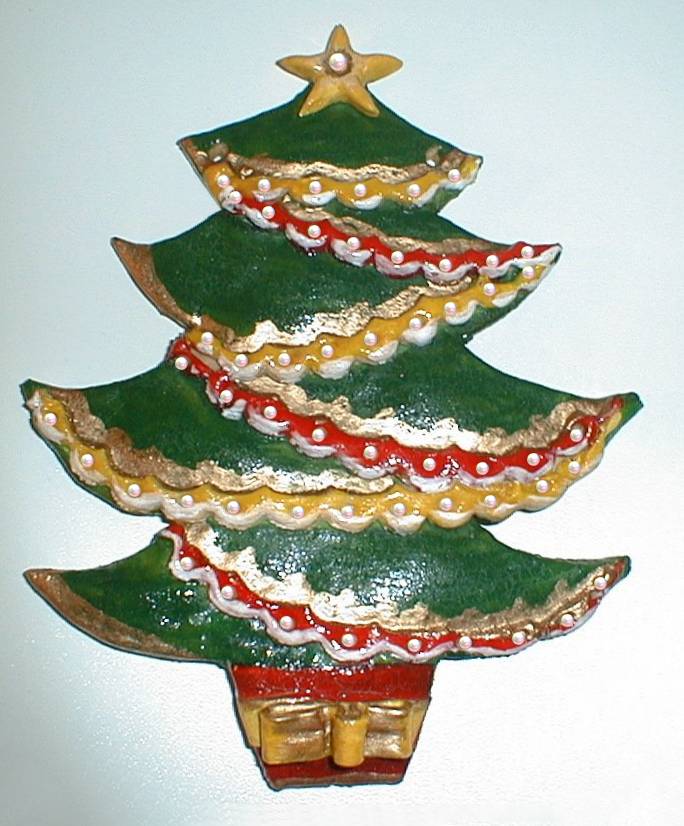
XMAS TREE PLAQUE
Paint the tree with a mid to dark green colour. If you make it too dark it will look black when varnished, so keep the colour fairly bright. Emerald green will seem quite dark once coated with varnish. Allow the base green coat to become touch dry.
Next paint the tub area red. You will probably need to paint the tub twice to get a good red. Paint the garlands any colours you like and leave to get touch dry. Paint the bow and star yellow.
Trim the scallop of the garland edges with a little freehand painting with some white paint. Next, add some gold lacquer paint to the bow, the star and above the garlands. Now leave to dry thoroughly, then apply varnish. Add the pearls, sequins, seed beads or dragees when the varnish is tacky. Dry overnight.
Make A Hanger
In all Salt Doughcraft pieces, insert a colour coordinated ribbon or gold ribbon through the holes you made during modelling.
Storage
After Christmas always store the painted salt dough items in a dry place. I think tissue paper will help protect them.
I don't recommend a far corner of the garage or the loft as I once left some there all year with disastrous results. When we checked the box not only were some circular items different shapes and quite distorted, but some had mouldy patches. It was our own fault as of course our storage loft is unheated. Now I store them in my dining room which is dry and airy.
Note the Xmas tree is about 9 inches high and the large holly wreath is about 9 inches across.
Page added 4 November 2005.