
Introduction - How to Pattern Draft a Skirt - the Basic
By Pauline Weston Thomas For Fashion-Era. com
Table of Contents
Why Hand Draft a Basic Skirt Block?
Why hand draft a basic straight skirt block pattern, as opposed to using pattern drafting software? There are many pattern drafting software products on the market, but you are probably reading this because you don't want to buy fashion pattern drafting software or use a computer to produce a dressmaking pattern.
Flat pattern drafting by hand is a useful skill to have if you like dressmaking and getting a good fit on garments. I now mainly use my knowledge to assist me with adaptations of bought patterns where I just want to alter a particular aspect of a style on the few occasions that I now sew since computing has taken over as my main hobby!!!
Blocks are also known as slopers and drafting a basic skirt block by hand is something I do in about 15 minutes. The less experienced will take about 35 to 60 minutes until they become familiar with the method. Some will take longer, others less and it can be a very satisfying experience for those who like to feel they don't have to use computer software for such a simple concept. The actual pattern drafting should not take more than 1 hour even for a beginner, particularly with the stage drawings I provide here. Provided you have already taken the body measurements of yourself or the person who will have the block you will soon get the task complete.
Printing These Skirt Block Webpage Images
You will see every web page here clearly deals with a different stage or stages of the skirt pattern draft and you can simply print off individual enlarged stage pictures of the sloper by clicking the on screen thumbnail images for an image version that will print without the web page side bars.
The basic or standard block here creates a straight block which is generally perfect for the current fashion skirt called a pencil skirt. It can be adapted into many styles and even tapered in a bit more according to fashion, but most people love the basic fit of this sloper skirt to their body.
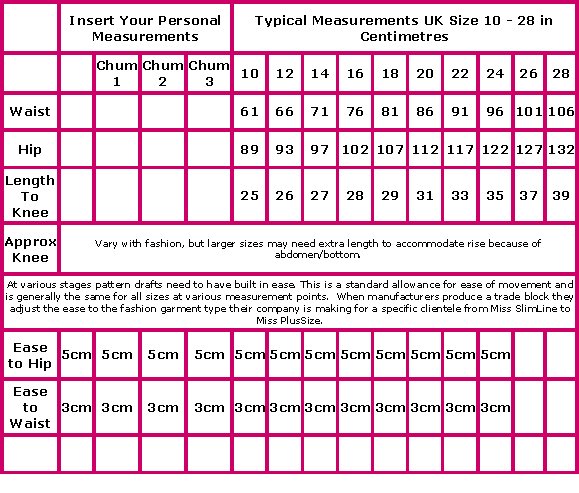
You can use my simple chart here to draft skirt blocks in sizes 10 to 28, but better still take the time to measure yourself with a tape measure and use your own measurements. The guide below will then alert you if your measurements are wildly out as you compare your records to the nearest stock size. The draft is best done in centimetres as they are easier to divide than inches during the pattern drafting exercise. Don't be alarmed at seeing parts of your body measure over 100 cm ....
| Insert Your Personal Measurements | Typical Measurements UK Size 10 - 28 in Centimetres | |||||||||||||
| Chum 1 | Chum 2 | Chum 3 | 10 | 12 | 14 | 16 | 18 | 20 | 22 | 24 | 26 | 28 | ||
| Waist | 61 | 66 | 71 | 76 | 81 | 86 | 91 | 96 | 101 | 106 | ||||
| Hip | 89 | 93 | 97 | 102 | 107 | 112 | 117 | 122 | 127 | 132 | ||||
| Length To Knee | 25 | 26 | 27 | 28 | 29 | 31 | 33 | 35 | 37 | 39 | ||||
| Approx Knee | Vary with fashion, but larger sizes may need extra length to accommodate rise because of abdomen/bottom. | |||||||||||||
| At various stages pattern drafts need to have built in ease. This is a standard allowance for ease of movement and is generally the same for all sizes at various measurement points. When manufacturers produce a trade block they adjust the ease to the fashion garment type their company is making for a specific clientele from Miss SlimLine to Miss PlusSize. | ||||||||||||||
| Ease to Hip | 5cm | 5cm | 5cm | 5cm | 5cm | 5cm | 5cm | 5cm | 5cm | 5cm | 5cm | 5cm | ||
| Ease to Waist | 3cm | 3cm | 3cm | 3cm | 3cm | 3cm | 3cm | 3cm | 3cm | 3cm | 3cm | 3cm | ||
The basic skirt block can later be adapted into a variety of styles and more variations can be created. I'll be dealing with how to split, slash and spread the skirt block later on. Yes this can be done with computer software, but maybe you want to learn how to do this just for the sake of it.
Pattern Drafting a Skirt - Measuring
Measuring the body to hand draft a skirt pattern block.
Picture Showing Where to Take Skirt Measurements
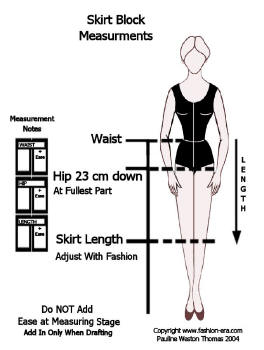
Measuring the Hip
To measure the hip use your tape measure to measure around the fullest part of the hips which is usually about 23 cm below the waistline. Take the tape measure around that fullest hip part until you have the hip measurement. But if your fullest part is much higher or lower than 23cm down make a note of that when you take the measurement.
Measuring the Waist
This is a measurement that should be taken right on the waistline and the tape should feel as firm as a waistband might.
Measuring Skirt Length
This is not difficult, but may cause you to debate a little. I usually use a measurement which is to the knee. In my case this is 56cm as I am the average UK height for a woman. Generally you may wish to make the block up to 70cm long dependant on current fashion.
But if you will mainly be making longer skirts and adaptations of this block, it's useful to have a to the knee block and also a mid calf or above ankle block. I leave you to decide. In the main don't worry too much about it at this at this stage because you just need to understand and be able to follow the method. The point of making the initial block is to get a good fit around the waist and hips.
The length is something you can always adjust later. Also when you make up a cotton or muslin or calico toile mock up of the pattern you have drafted from these instructions, you are better having one to the knee so you can adjust the side seams easily if required.
Centimetres to Inches Chart
How to Pattern Draft a Skirt - Stages
The general text stages of the draft - overall in one place.
The skirt block is drafted in stages and every text stage is detailed on this page below. Advanced users who have made blocks before may prefer this one page method to the stage aid pictures and text that follow on the next pages.
My preferences is for the picture/text stages shown on the following 10 pages. Each have thumbnail pictures with text instructions for that particular stage, making it easier to teach a group stage by stage. On the following pages each picture enlarges to full A4 size with all also suitable for class use with Overhead Projectors once copied to OHP transparent film sheets.
You are Aiming to Achieve This -The Skirt Block After Completion.

Stages of the Pattern Drafting of the Skirt
Part 1 - The Rectangle
I will explain how to construct an independent skirt block drafted in cms. This block is suitable for adaptations of skirt styles which will follow in this major section.
As a general guideline use a sheet of paper which is about 70cm by 90cm or more. You can use proper pattern drafting paper available from MacCulloch and Wallis of West London or dressmaking suppliers. If you don't have this use brown paper, greaseproof paper, back of gift wrap or Vilene.
Have to hand a sharp pencil, a metre rule, a short ruler, a tape measure and a set square. Please don't use a felt pen to draft with. Mistakes can multiply as felt pens make wider lines.
Stage 1 - Draw a line down on the left of your paper which measures your skirt length plus 1cm. Mark the terms Centre Back and Hemline as shown.

Stage 2 - Use your hip measurement from your list and add the ease of 5cm to it. Divide that figure by 2.
Use a set square to draw a line across the page and mark off this measurement of hip plus ease divided by 2.

Stage 3 - Using a set square draw a line on the right of your paper which measures your skirt length plus 1cm. Mark the term Centre Front as shown above.

Stage 4 - Join the two sides. Check that the top measurement of your rectangle is accurate and measures the hip measurement plus ease divided by 2. If out re check the side lines with a set square.

Add your name and the date in the bottom right and left corners.
Part 2 - Hipline and Side Seam
Construct the skirt block hipline and the side seams stages 5, and 6.
Stage 5 - From the top waistline edge of the rectangle mark several positions 24 cm down which are parallel to the waist. Join up those dots and you now have your hipline position.

Stage 6 - Draw your side seam in by dividing the rectangle at the centre. Using a measurement half the width of the rectangle mark points at the waist, hip and hemline. Join them up.

Part 3 - Marking the Waist
Stage 7 - Next mark the waist. To do this measure 5 cm on each side of the side seam line at the top of the rectangle and make a clear mark on each top waist line. N>B

If you have a thicker waist this is the time to make that adjustment. So for example to allow for a thicker waist you might make those same marks, but only 4cm instead of 5cm.
Part 4 - Make the Hip Curves
Stage 8 - Where you placed the side mark at the left back waist side seam in the last stage, is the point for you to begin your hip curve.

Now draw a shallow curve from the back waist mark to the side seam and ending at the hipline.
Stage 9 - Where you placed the side mark at the right front waist side seam in stage 7 is the point for you to begin your right front hip curve.
Draw a shallow curve from the back waist mark to the side seam and ending at the hip line.

Part 5 - The Front Waist Curve
Stage 10 - At the top of the centre front seam use a set square and measure down 1 cm. Make a right angled mark on the centre front line at the 1cm point.

Now curve that line across to meet the side waist at the top of the side seam hip curve. This is shown as a red line in the picture above. This makes the front waist line.
The top of the back skirt waist is a straight waist line and needs no curving.
Part 6 - The Back Dart Position.
Stage 11 - Measure the length of the straight back waist from centre back to the new side waist mark. Make a note of that measurement and call it measurement A
Now take the actual total waist measurement from your list and divide it by 4. Call it measurement B.
Take measurement B from measurement A.
With the difference you will make one dart or two darts.

If the difference is less than 4cm you will make 1 dart only. If the difference is more than 4cm you will make 2 darts.
The first dart or single dart will be 9cm away from the centre back. Mark the spot 9cm from the centre back waist on the waistline. From that point drop a spot or line 15cm long and at right angles from the first mark.
Now divide the dart difference equally on either side of that line. Make 2 equal marks.
Part 7 - Joining Back Darts
Stages 12 and 13 - Join up the points made in stage 11 to produce the back dart shown in stages 12 and 13.


Part 8 - The Front Darts
Stage 14
To find out how much excess you have for the front darts you need two measurements.
First take the actual waist measurement from your personal list and divide it by 4. Call the figure you get C.

Next use your tape measure and measure the front waist curve on the actual block. To do this stand the tape up on its end and shape it around the curve you have drawn earlier. Call this figure D.
Take C away from D. This figure is the excess you use to make your front darts on the curved waistline.
Now make the main front (red) dart. Use a set square to help. Mark several points 10 cm away from the centre front line at the top area of the block. Make it 11cm long.
Stage 15
Make sure the line you draw for the main front (red) dart is parallel to the centre front. Check it is 11cm long. Make it up to 2cm wide at the top edge of the waist.

If you have more excess to use up than 2cm, then move along the waistline to the next clear area and place it exactly between the hip curve edge corner and the centre top of the first dart you made.
Make any second dart 11 cm long and as parallel as possible to the hip curve.
Stage 16 - Completed Block Diagram
The block is now complete, but you will need to know how to deal with larger waists and cutting the blocks and making a muslin style toile on the next few pages.

Part 9 - Thicker Waistlines
Stage 17
When you mark the points for the waistline in stage 7 you can adjust this stage to accommodate a thicker waist.

So for example instead of marking points 5 cm in from the side construction seam as instructed you might mark them 4cm cm in, allowing the waist on your block to be 1 cm larger on each side.
Bearing in mind the principles of symmetry this will make the waistline a total of 4cm larger overall when the item is constructed as a toile or straight skirt garment.
So use the instruction given in Stage 7 to make the gentle curve to the hipline, but with your wider waist measurements in mind.
Part 10 - Cut the Net Blocks
To make the net block cut away the waste paper at the centre front curve.

Finally separate the two blocks by cutting evenly up the side seam. For each stage picture with its own text explanation go to these pages.
Part 11 - The Toile
Next you will need to make a toile in muslin to check the fit of the block. The pattern derived from the block may fit perfectly or you may need to let out or take in darts and side seams if required and then transfer those adjustments from the fabric alterations to the card block.
Making the Toile
To make the toile you will need approximately 1.60cm of 90cm wide cotton fabric or 80cm of 150cm wide fabric. If you are on the large or on the taller side you may need to adjust this amount and simply by twice your finished length of fabric.
Separate instructions exist for making the toile:
First make a paper pattern with SEAM ALLOWANCES!
Take the 2 basic block patterns and redraw/trace them onto fresh paper. Now add a side seam allowance down both sides of 1.5 cm. Do not add any allowance at the waist or at the hem.
See below for how much fabric you need to check the block fit.
Place the new pattern pieces on the straight grain of the muslin fabric as shown in the diagram and cut out the fabric pieces ready to make up the skirt.
This completes the basic making of a hand drafted skirt block. For stage pictures click on the individual pictures or enlarge the main picture on this page.
Once the toile fits and you are happy with the block make them up in card or iron on Vilene onto your original draft to stabilise it.
Fabric Layout


Order of Construction For those unfamiliar with sewing.
1. The order of work would be to first join the centre back seam leaving a 20cm space for the zip at the top of the centre back at waist level.
2. Press the back seam open.
3. Insert the zip.
4. Next make the darts in both back and front skirts.
5. Press the darts toward centre front and centre back of the pieces over a rounded ham tailoring aid.
6. Place the two right sides of the skirt pieces together and pin then tack the side seams. Use a loose machine stitch about number 4 to machine the pieces to together. This will enable you to quickly unpick the seam if the skirt is too tight or too large for your figure.
7. Try on the skirt toile and adjust the darts or seams to fit by letting them out or taking them in as needed.
8. Check the waist sits correctly and that the skirt length is to your liking as a finished length. If you need to add more length or remove length make a note of it now.
9. Transfer fitting alterations to the basic block and either stick the resultant paper pattern block onto firm card or make a card version of the exact pattern block.
Fabric Required to Make the Muslin Toile
To make the toile you will need approximately 1.60cm of 90cm wide cotton fabric or 80cm of 150cm wide fabric. If you are on the large or on the taller side you may need to adjust this amount and simply by twice your finished length of fabric.
Making a Waistband
I have assumed that those using these pattern drafts and adaptations will add already know how to sew and are familiar with bought patterns.
Using the skirt block without any adaptation apart from a back kick pleat produces a nice fitting straight skirt. This season pencil skirts are back in fashion and by using this block cut no longer than the knee you can make fashionable skirt.
To make the straight skirt, the basic blocks should be drawn around on fresh paper and 1.5cm seam allowance added to the sides, centre back and waistline of the new drawings. The hem should have 4cm allowance added to it and the darts, straight grain and hem allowance should all be clearly marked. The waistband pattern is made as shown in this diagram I've made.
Waistband pattern to be used with the majority of skirt adaptations to come.
1. A to B the pink portion equals your waist measurement.
2. C the blue portion equals an additional 3 cm for the fastening overlap.
3. D to E is the depth of the finished waistband of 6cm which when folded in construction is reduced to 3cm.
4. The sewing allowance for seam allowances all around the band is an additional 1.5cm. Make sure this added to the 6cm depth and the length of the band or you will have problems in construction.

Conclusion - Pattern Drafting
Pattern drafting is classified in library systems as engineering. Here I shown individual stages of hand drafting the Skirt Block.
I have attempted to simplify the stages to make everything easy to understand with stage aid drawings.